
My Journey to Kernel Power - Part 1
A practical exploration of loading Windows kernel drivers, enabling SeLoadDriverPrivilege, and reaching NtLoadDriver from user mode.
Series note: My Journey to Kernel Power is a multi-part series. This first part establishes the theoretical foundation: Windows driver architecture, communication between user mode and kernel mode, driver loading mechanisms, and the privileges required to load a driver. The following parts will move from theory to practice by applying these concepts in a controlled lab environment, analyzing real driver interfaces, and interacting with them in user mode.
Anyone working in Incident Response encounters a wide variety of threats daily: Identity Theft, Ransomware, Spyware, and Insider Threats are just a few examples. However, I find Malware that interacts with kernel drivers to be particularly fascinating. On the Kernel level, even established EDR and XDR solutions can reach their limits. That’s exactly what sparked my interest in Bring Your Own Vulnerable Driver (BYOVD). I wanted to find out if it’s possible to identify a vulnerable driver that is yet on any blocklists or detected by EDR.
How can BYOVD be abused?
To use a driver in a Red Team Scenario, several prerequisites must be met. The most important one, is first and foremost having a driver that exposes the kernel API functions we want to use. The exciting thing about kernel-level APIs (as indicated by the Zw* naming prefix) is that they operate on Ring 0
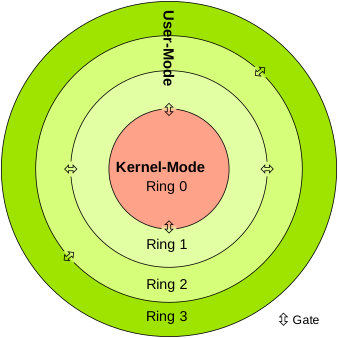
In general, any driver running in Kernel mode has the same permissions as the other drivers that are running. In a Red Team scenario, this is naturally useful, for example, to disable or manipulate Security Solutions (EDR/XDR). Since applications launched as User/Admin/SYSTEM are on User Mode Ring 3, they do not have direct access to the Zw* API calls. There are several ways for an user-mode application to interact with a driver. The most commonly used and simplest method is via so-called IOCTL codes, which we’ll focus on first. By using IOCTL codes, you can access functions provided by the driver and also pass parameters to the driver from user mode.
NTSTATUS DispatchDeviceControl(PDEVICE_OBJECT DeviceObject, PIRP Irp)
{
    ULONG ioctl = stack->Parameters.DeviceIoControl.IoControlCode;
    NTSTATUS status;
    ULONG_PTR information = 0;

    switch (ioctl) {
        case 0x555555:
            InteresingFunctionCall();
            status = STATUS_SUCCESS;
            break;

        default:
            status = STATUS_INVALID_DEVICE_REQUEST;
            break;
    }

    return status;
}
In addition, the function IoCreateDevice must be called in DriverEntry. The syntax is as follows.
NTSTATUS IoCreateDevice(
  [in]           PDRIVER_OBJECT  DriverObject,
  [in]           ULONG           DeviceExtensionSize,
  [in, optional] PUNICODE_STRING **DeviceName**,
  [in]           DEVICE_TYPE     DeviceType,
  [in]           ULONG           DeviceCharacteristics,
  [in]           BOOLEAN         Exclusive,
  [out]          PDEVICE_OBJECT  *DeviceObject
);
The DeviceName is relevant to us because this name is used to create a Windows object for the driver, which we need to interact with the driver.
These two pieces of Information are sufficient to send simple IOCTL codes to the device object.
From a user-mode perspective, Microsoft provides us with a very simple Windows API that does most of the work for us. First, we need to obtain a handle to the device object. We can do this using CreateFile or NtCreateFile. We’ll see exactly how that works later. With the handle and the desired IOCTL code, we can call the relevant function, DeviceIoControl, which passes the request to the driver.
To obtain a handle for the DeviceObject, the driver must, of course, be loaded and running. In most cases, the required driver is not loaded yet. However, running it requires local Administrator Privileges.
Loading Driver
When you download a driver for a device, you usually get the following files: .inf, .cat, and .sys. As an administrator or user, you install it via INF, which is a kind of descriptor file that specifies how the driver should be installed, but it does not contain the actual binary content. Technically speaking, the driver consists solely of the SYS file, which contains the code logic.
However, this cannot be launched like a normal executable (exe) by double-clicking or via the command line.
Command Line Way
However, there are several ways to load a SysFile the “most official” one is to load/start by using the Windows Service Manager. The easiest way is to create the driver using sc:
sc create driverServiceName type=kernel binPath=C:\Path\To\sysFile.sys

This creates a new key in the registry with the name which was specified.
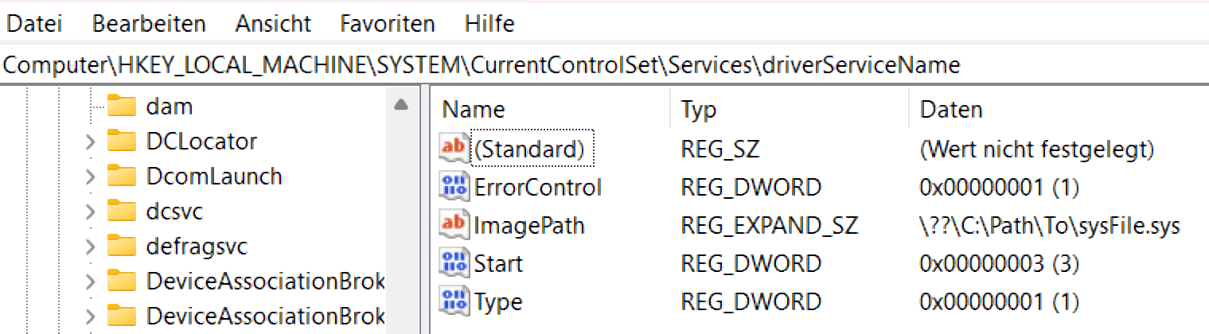
However, simply creating the driver does not load it you must start it via the Service Manager, which can also be done using sc.
sc start driverServiceName
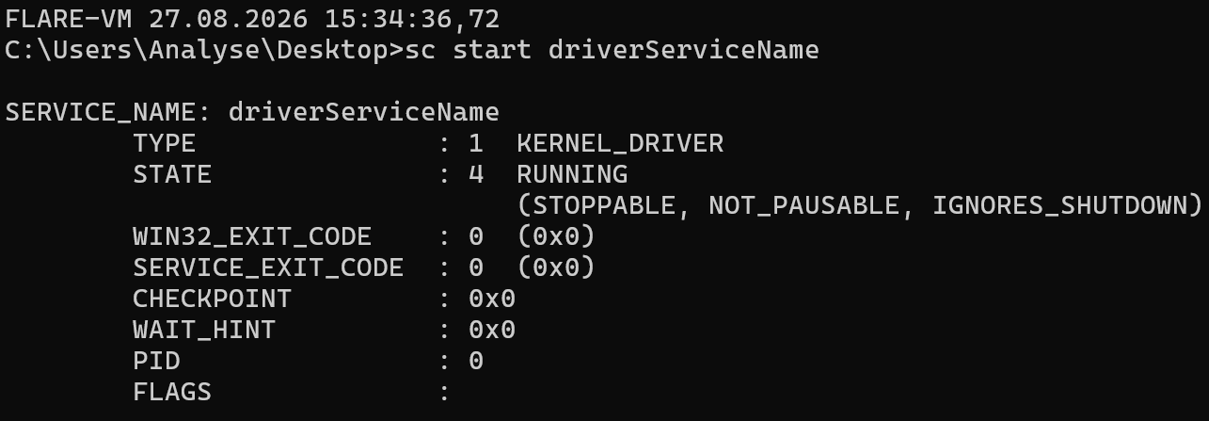
If the status is RUNNING, the driver has been loaded correctly
The driver can define its own attributes (STOPPABLE, NOT_PAUSABLE, IGNORES_SHUTDOWN), and with this combination, the driver can no longer be stopped via the ServiceManager
Official Windows API
The driver can also be installed via the WinAPI using the Service Manager. To do this, you must first obtain a handle using OpenSCManager.
SC_HANDLE OpenSCManager(
  [in, optional] LPCSTR lpMachineName,
  [in, optional] LPCSTR lpDatabaseName,
  [in]           DWORD  dwDesiredAccess
);
Using the handle returned by the function, you can call the CreateService function to create a service of type SERVICE_KERNEL_DRIVER (0x00000001).
SC_HANDLE CreateService(
  [in]            SC_HANDLE hSCManager,
  [in]            LPCSTR    lpServiceName,
  [in, optional]  LPCSTR    lpDisplayName,
  [in]            DWORD     dwDesiredAccess,
  [in]            DWORD     dwServiceType,
  [in]            DWORD     dwStartType,
  [in]            DWORD     dwErrorControl,
  [in, optional]  LPCSTR    lpBinaryPathName,
  [in, optional]  LPCSTR    lpLoadOrderGroup,
  [out, optional] LPDWORD   lpdwTagId,
  [in, optional]  LPCSTR    lpDependencies,
  [in, optional]  LPCSTR    lpServiceStartName,
  [in, optional]  LPCSTR    lpPassword
);
If the call to CreateService is successful, we will receive a handle to the new service, we use this handle to call StartService to start the driver.
BOOL StartServiceA(
  [in]           SC_HANDLE hService,
  [in]           DWORD     dwNumServiceArgs,
  [in, optional] LPCSTR    *lpServiceArgVectors
);
Undocumented NT API
If these methods are not available, for example, because the installed EDR is blocking them, you can fall back on an undocumented NT API: NTLoadDriver
NTAPI NtLoadDriver(
    [In] PCUNICODE_STRING DriverServiceName
);
It requires the SeLoadDriverPrivilege token
To use this API, you must create a key in the registry in HKLM\SYSTEM\CurrentControlSet\Services\ with a unique name. Under this key, you’ll then create a string value named ImagePath and set its value to the path to the driver file. Additionally, a DWORD named Type must be created with a value of 1 (which, as in CreateServer, represents the type SERVICE_KERNEL_DRIVER).
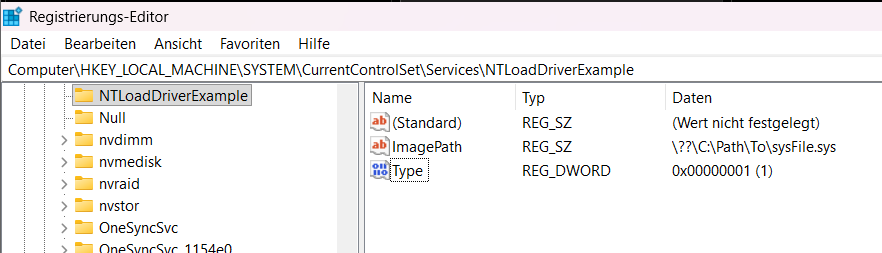
Now, that we’ve made all the necessary preparations, we can get started on the exciting part. In order to do this, I first used the following code to add the SeLoadDriverPrivilege to the process token required for the NtLoadDriver call
This process also requires local administrative privileges
#include <iostream>
#include <Windows.h>

int main()
{
    HANDLE processToken;
    HANDLE currentProcess = GetCurrentProcess();

    OpenProcessToken(currentProcess, TOKEN_ADJUST_PRIVILEGES | TOKEN_QUERY, &processToken);

    TOKEN_PRIVILEGES newPrivileg;
    newPrivileg.PrivilegeCount = 1;
    newPrivileg.Privileges[0].Attributes = SE_PRIVILEGE_ENABLED;

    LookupPrivilegeValue(NULL, L"SeLoadDriverPrivilege", &newPrivileg.Privileges[0].Luid);

    AdjustTokenPrivileges(processToken, FALSE, &newPrivileg, sizeof(newPrivileg), NULL, NULL);
}
First, we obtain a handle to our own process, and use it to open the process’s token. The permissions TOKEN_ADJUST_PRIVILEGES and TOKEN_QUERY are relevant here, as they will be needed later on.
The TOKEN_PRIVILEGES struct contains information on how we want to adjust the token it allows us, to control whether privileges should be added or removed. In this case, we need one additional privilege. The struct requires the LUID for the SeLoadDriverPrivilege. We obtain this using the helper function LookupPrivilegeValue.
The LUID is an ID assigned to the privilege it can vary with each Windows build, so it’s better to query it rather than use a hardcoded magic value. The following image shows the default tokens that the process received.
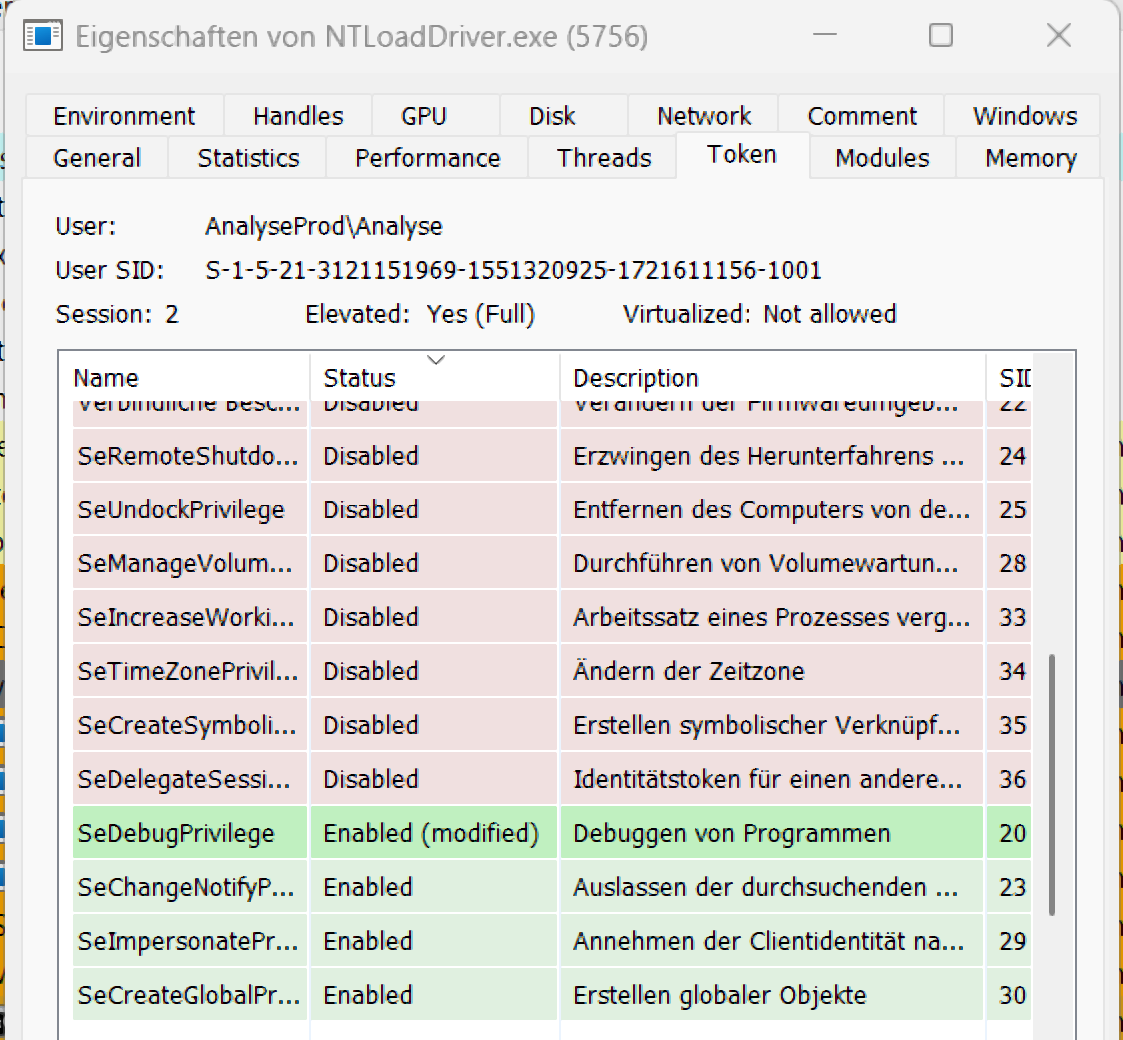
As the name suggests, AdjustTokenPrivileges allows us to adjust the token privileges using the struct and the handle.
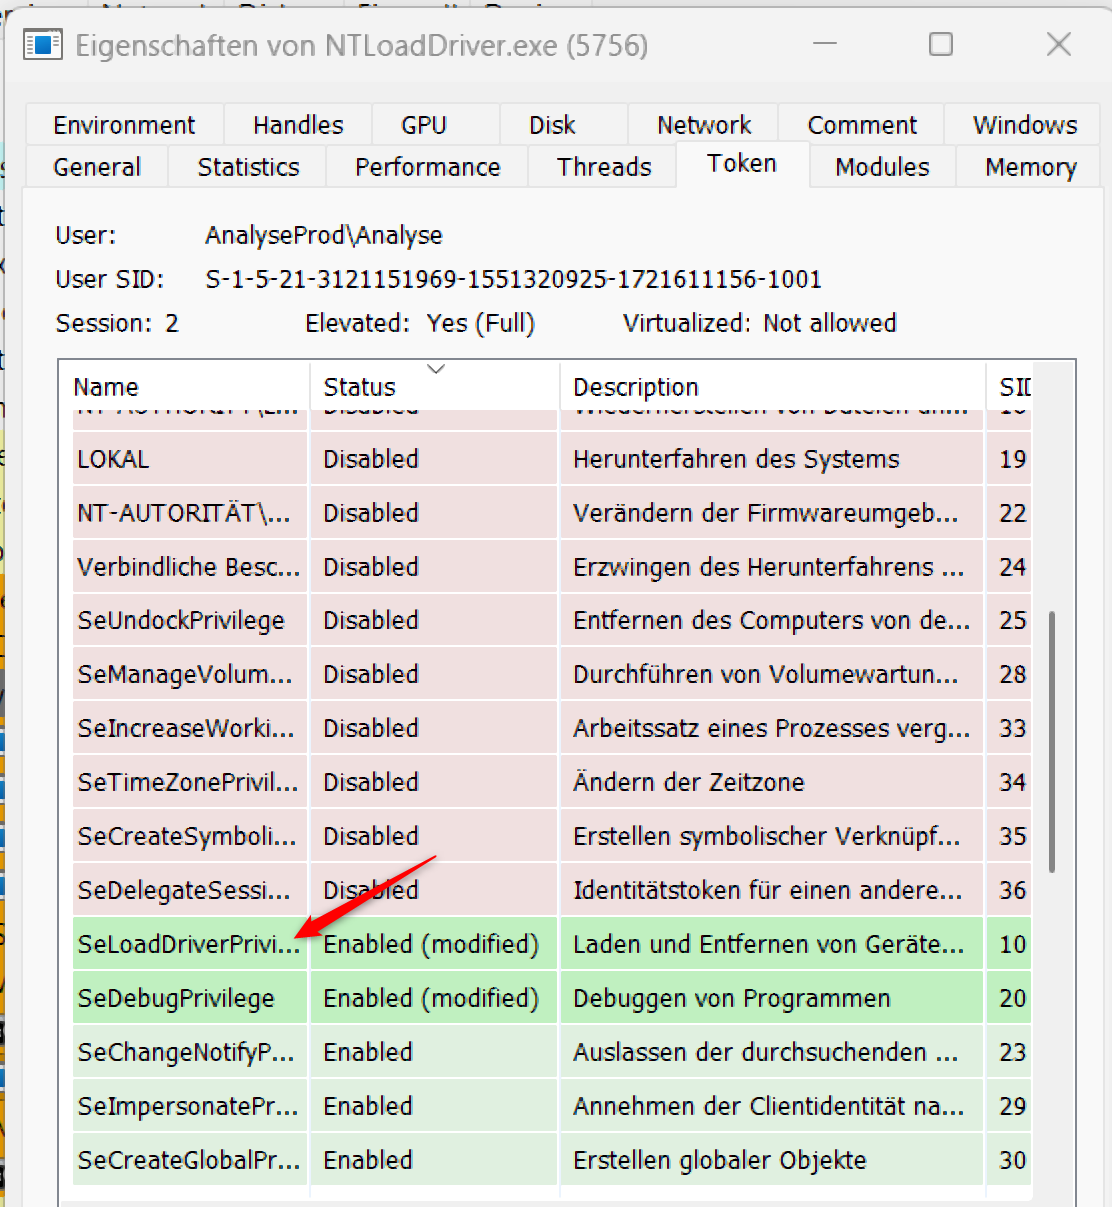
After calling AdjustTokenPrivileges, we can now see that our own process has been granted the SeLoadDriverPrivilege.
After all the preparations, we can now actually execute NtLoadDriver. However, since there are no native header files that which contain NtLoadDriver, we’ll have to put in a little extra effort. First, we need a handle to ntdll.dll since it exports NtLoadDriver we can obtain the handle using GetModuleHandle.
HMODULE GetModuleHandle(
  [in, optional] LPCSTR lpModuleName
);
Since ntdll.dll is automaticly loaded into every process during startup, we don’t need LoadLibrary.
However, this gives us the handle to the DLL, but not to the function. To put it another way, we now know the street where the house is located, but not the house number. Now, to find out our House number, we use GetProcAddress.
FARPROC GetProcAddress(
  [in] HMODULE hModule,
  [in] LPCSTR  lpProcName
);
In order to do this, we have to pass two parameters: the handle to ntdll (which we obtained using GetModuleHandle) and the name of the procedure—in our case, NtLoadDriver. If this works, we will receive the address of the function (our House number), which we will then use to call it. Thus, NtLoadDriver is now available at runtime in our code. NtLoadDriver requires the driver path (which we previously created in the registry) as an input parameter in the form of a pointer which points to a UNICODE_STRING struct.
The UNICODE_STRING struct can be initialized using the small helper function RtlInitUnicodeString.
VOID RtlInitUnicodeString(
  [out]          PUNICODE_STRING DestinationString,
  [in, optional] PCWSTR          SourceString
);
This is defined in
winternl.hTherefore, we will now initialize aUNICODE_STRINGwith the full registry path to the driver.
UNICODE_STRING driver{};
RtlInitUnicodeString(&driver, L"\\registry\\machine\\SYSTEM\\CurrentControlSet\\Services\\NTLoadDriverExample");
Now we’ll get to the final preparations (I promise). We know the address of NtLoadDriver, but we don’t know what the function looks like. The compiler doesn’t know the return type, or the parameters. Therefore, we’ll define what NtLoadDriver “looks like.”
typedef NTSTATUS(NTAPI* NtLoadDriver)(PUNICODE_STRING);
We’ve already seen above how this function works in general. So I’ll just briefly discuss NTAPI* to explain how the definition and parameters are exchanged on the assembly level.
Now we can call NtLoadDriver using parameters. If NtLoadDriver is successful, we’ll receive STATUS_SUCCESS any value other than 0x0 indicates an error.
If we combine the TokenAdjustment with the driver-loading code, we’ll get the following:
#include <iostream>
#include <Windows.h>
#include <winternl.h>

#pragma comment(lib, "ntdll.lib")

typedef NTSTATUS(NTAPI* NtLoadDriver)(PUNICODE_STRING);

int main()
{

    HANDLE processToken;
    HANDLE currentProcess = GetCurrentProcess();

    OpenProcessToken(currentProcess, TOKEN_ADJUST_PRIVILEGES | TOKEN_QUERY, &processToken);

    TOKEN_PRIVILEGES newPrivileg;
    newPrivileg.PrivilegeCount = 1;
    newPrivileg.Privileges[0].Attributes = SE_PRIVILEGE_ENABLED;

    LookupPrivilegeValue(NULL, L"SeLoadDriverPrivilege", &newPrivileg.Privileges[0].Luid);

    AdjustTokenPrivileges(processToken, FALSE, &newPrivileg, sizeof(newPrivileg), NULL, NULL);

    HMODULE moduleHandle = GetModuleHandle(L"ntdll.dll");

    if (moduleHandle != NULL) {

        NtLoadDriver loadDriverProc = (NtLoadDriver)GetProcAddress(moduleHandle, "NtLoadDriver");

        if (loadDriverProc != NULL) {
            UNICODE_STRING driver{};
            RtlInitUnicodeString(&driver, L"\\registry\\machine\\SYSTEM\\CurrentControlSet\\Services\\NTLoadDriverExample");

            NTSTATUS result = loadDriverProc(&driver);
        }
    }
}
Possible Attack Scenarios in the Kernel
If you want to find a BYOVD, you usually already have an idea of what it might look like, the most common attack scenarios are the following types.
Process Termination
One of the most attractive target for an attacker is to use drivers, to stop active security solutions. One possible way to terminate these solutions is to exploit a driver, which for example uses ZwTerminateProcess
NTSYSAPI NTSTATUS ZwTerminateProcess(
  [in, optional] HANDLE   ProcessHandle,
  [in]           NTSTATUS ExitStatus
);
This feature also allows us to terminate EDR processes, for example, on the Kernel level. Since there is no easy possbility for a legitimate driver to block this API call within the Kernel, EDR vendors rely on blocking the path leading up to the API call, rather than blocking the call itself.
Arbitrary Memory Read
Another common problem associated with vulnerable drivers is their interaction with memory from Kernel mode.
With a driver which provides a read operation, an attacker can, best-case scenario, specify address range to be read. A pseudo-function might look like this.
ReadUnrestrictedMemory(
  [in]PVOID SourceMemory Address,
  [in]SIZE_T length,
  [OUT] byte* buffer
  );
However, further processing will then take place in user mode in most cases, the driver only serves as an “interface” to retrieve the data and not to implement the entire code logic.
Arbitrary Memory Write
Things get exciting with a Kernel arbitrary write attack vector, as it offers the possibility to create, modify, or delete (CRUD) arbitrary data in virtual memory and this is where it really starts to get interesting.
- Extending process privileges
- Elevating user privileges
- Manipulating EDR callbacks
- Modifying protected processes
Driver Signing
As previously explained, kernel drivers have many ways of compromising the integrity of the system or security solutions.
Starting with Windows Vista, Microsoft started making the driver Architecture more secure. Since Vista, drivers must be signed in order to be loaded at all. During the signing process, a large portion of the file is hashed but not simply the entire file byte by byte. Instead, the file is parsed as a Windows PE file, and elements such as the header, import/export tables, and other data are hashed. The result is a hash that is then signed with the company’s private key. This signature is written directly into the PE file (in our case, SYS). Versions prior to Windows 10 1607 loaded drivers if they could provide a valid certificate chain (Microsoft Cross Signing). This allowed manufacturers to sign as many drivers as they wanted, including new versions. As a result, drivers that were secure in an earlier version could be signed in a later version without further verification by a third party, and every Windows computer would initially trust that driver. For this reason, Microsoft introduced an additional requirement in Windows 10 version 1607 which must be met for a driver to load successfully. To load a driver in these newer versions, the driver must be signed by Microsoft itself, aswell drivers are only signed by Microsoft if they pass a testing program, which means that even new versions of the driver must be signed by Microsoft.
Driver Blocklist
However, it is possible that drivers that have already been signed, may contain security vulnerabilities which are not discovered, until after they have been released. To protect the system, there is a kind of blacklist of drivers which are known to be insecure. The Vulnerable Driver Blocklist already existed in Windows 10 but was not enabled by default there. This has changed with Windows 11, however now, every time a driver is loaded, the list is checked to see if the driver we are trying to load is on it, if so, the process is aborted.
Unfortunately, the Vulnerable Driver Blocklist is not always up to date, it has been proven, that it will take some time for drivers, currently being exploited, to be added to the list.
Security solutions such as Windows Defender Application Control offer the option to maintain a user-defined blacklist, for example all drivers listed at LOLDrivers should be added here, as they are already known to be exploited.